
Customer segments enable retailers to dynamically display content and promotions to specific customers, based on address, previous orders, the contents of their shopping carts, and so on. Retailers can optimise marketing plans based on targeted segments with shopping cart price rules and banners. You can generate reports and export the segmentation list of targeted customers. As customer segment information is dynamic, it is updated constantly so customers can be associated and dissociated from a segment as they progress through the buying cycle. Customer segments are also a great way of finding out general information about your customers and using that data for additional strategies.
Segment Attributes
Customer segments are established in a similar way to catalog price rules and shopping cart rules. Before you start, ensure the customer attribute you wish to use has the ‘Use in customer segment’ property set to ‘Yes’.
You can do this within the Magento 2 admin by navigating to Stores > Attributes > Customer then select the attribute you want to use and change ‘Use in customer segment’ property to ‘Yes’.
Customer Address Fields
You can define any of the address fields, such as city or country. Any address in a customer’s address book can match these conditions for the customer to match. Or, you can specify that only the default billing or shipping addresses can be used to match a customer. Customer address attributes are available only for customers who are logged in to their accounts.
Customer Information Fields
Miscellaneous customer information can be defined, including Customer Group, name, email, newsletter subscription status, and Store Credit balance. Customer information is available only for customers who are logged in to their accounts.
Cart Fields
Cart properties can be based on either quantity (line items or total quantity) or the value (grand total, tax, gift card, etc.) of the cart contents.
Products
You can reference products that are currently in the shopping cart or wish list, or that have previously been viewed or ordered. You can also set a date range for when this occurred. The products are defined using product attributes.
Order Fields
Order characteristics for past orders can be defined based on the billing/shipping address in the order, the total or average amount or quantity of the orders, or the total number of orders. You can also set a date range for when this occurred, and the order status of the orders that match these conditions. Available only for customers who are logged in. Conditions that are set for shoppers who are not logged in stop working when they log in.
Creating a Customer Segment
Creating a customer segment is similar to building shopping cart price rules. The only difference is the options also include customer-specific attributes.
Enabling Customer Segments
- Within the Magento admin, navigate to Stores > Settings > Configuration.
- In the left panel, select ‘Customers‘ and choose ‘Customer Configuration‘.
- Expand the Customer Segments section.
- Check Enable Customer Segment Functionality is set to ‘Yes‘.
- When finished select Save Config in the upper right corner of the screen.
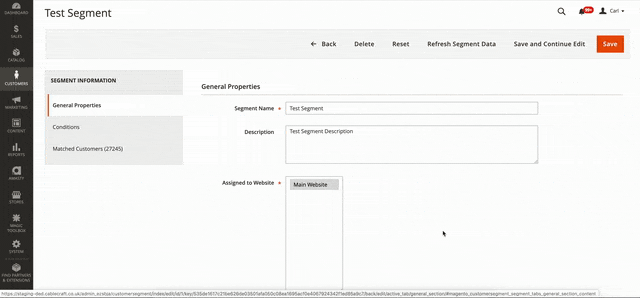
Add a Customer Segment
-
- Within the Magento admin navigate to Customers > Segments.
- In the top right corner, select Add Segment
- Now complete the Segment Information.
- Enter a Segment Name to identify the customer segment
- Enter a brief Description which explains the purpose of the segment.
- Set Assigned to Website to the website where the customer segment can be used.
- To activate the customer segment, set Status to Active.
- To identify the customers which this segment applies to, set Apply to to one of the following:
- Visitors and Registered Customers
- Registered Customers
- Visitors
- Now select Save and Continue Edit to save your work and so the Conditions in the left pane appear.
Define the Conditions
- Within your new customer segment, in the left pane, select Conditions.
- For this example we are going to create a condition to show us customers who have made 5 or more orders from January 1st to November 1st.
- Click Add (+) to display the list of conditions and select Number of Orders.
- Select is to display the condition control options and select equals or greater than.
- Select … and enter the value of 5 to indicate you want to find customers who have placed 5 or more orders.
- Click Add (+) again to display the list of conditions and select Date Range.
- Select … and then click the list icon to show the date range fields.
- Now, enter the From date and To date which for this example will be From 1st January 2019 To 1st November 2019 then click the tick icon.
- Finally, select Save and Continue edit to save your conditions and also refresh your number of Matched Customers.
- Once your segment has been saved you can now view your list of customers who match your condition rules within the Matched Customers section in the left pane. From here you can export the list via a CSV.
Segment Name
A name that identifies the segment for internal reference.
Description
A brief description that explains the purpose of the segment for internal reference.
Assigned to Website
The single website where the segment can be used.
Status
Activates and deactivates the segment. Any associated price rules and banners are deactivated when the segment is disabled. Options include: Active / Inactive.
Apply To
Defines the customer types to which the segment is applied. The selection influences the set of conditions available for creating the segment. The setting cannot be changed after the segment is saved.
Options are:
-
- Visitors and Registered Customers – Includes all shoppers, regardless of whether they are logged in to an account.
- Registered Customers – Includes only shoppers who are logged in to an account.
- Visitors – Includes only shoppers who are not logged in to an account.
Next Steps
Try it for yourself
Use our demo store to try out customer segmentation for yourself. If you are a retailer interested in finding out more about Magento 2, contact [email protected] and request a demo and we will send you access information for our Fluid Digital demo store.
Fancy a Magento 2 demo?
Contact us here and we will arrange a time and date to show you more Magento features.
Note: The information in this article was correct as of 27/11/2019 for Magento V2.3.3 Commerce Cloud
Source: Magento.com